Next.js allows us to build full, scalable e2e applications. In this article, we will explore together how to create and maintain a Next.js API, in the same repository as the UI layer.
Why combine the API and UI?
Creating an API combined with UI is not considered a standard pattern. Usually, we separate those two things for reasons such as performance, scaling, and team structure. For example, frontend devs can work independently from backend teams, and services can be deployed separately.
So why and when would we actually want to combine that?
One of the best things about Next.js APIs is how flexible they are. You can use them as a shared backend for multiple clients, like your web app, a mobile app, or even third-party integrations.
They also work great as a middle layer. If you want to hide external services or clean up messy data before it reaches the frontend, route handlers give you a clean way to do that.
Even custom auth is possible. Whether you’re managing sessions, tokens, or cookies, it can all live in your Next.js API without needing a separate backend service.
Also, maybe you have a small application to write, and it’s fun to have everything in one place.
The Technology Stack for the API
- You can find repository for the article right here,
- Prisma as TypeOrm,
- Dockerized PostgreSQL database
Files setup
Next.js in version 13 introduced web standard Request/Response APIs, where you can create route.ts files anywhere inside the app/ directory. To keep the API layer separately, this is how I organized my files
|
1 2 3 4 5 6 7 |
src/ ├── app/ │ ├── api/ │ │ └──users/ │ │ ├── [id]/ │ │ │ └── route.ts # GET, PUT, DELETE single user │ │ └── route.ts # GET all users, POST new user |
As you can already see, we have to keep dynamic paths like api/users/:id separately, using dynamic segments.
Setting up TypeOrm
As mentioned above, our ORM of choice is Prisma. You can find out why I personally like it in this article.
First, let’s install the necessary dependencies. We need the Prisma Client for our application code and the Prisma CLI as a development tool for migrations and generation.
|
1 2 3 |
bun add @prisma/client bun add –d prisma |
Now, let’s initialize Prisma in our project. This command will create a new Prisma directory containing a schema.prisma file and an .env file for your database connection string.
|
1 |
bunx prisma init |
This creates the following structure:
|
1 2 3 |
prisma/ └── schema.prisma .env |
The prisma/schema.prisma file is the heart of your setup. It’s a single source of truth where you define your database connection, client generator, and all your data models.
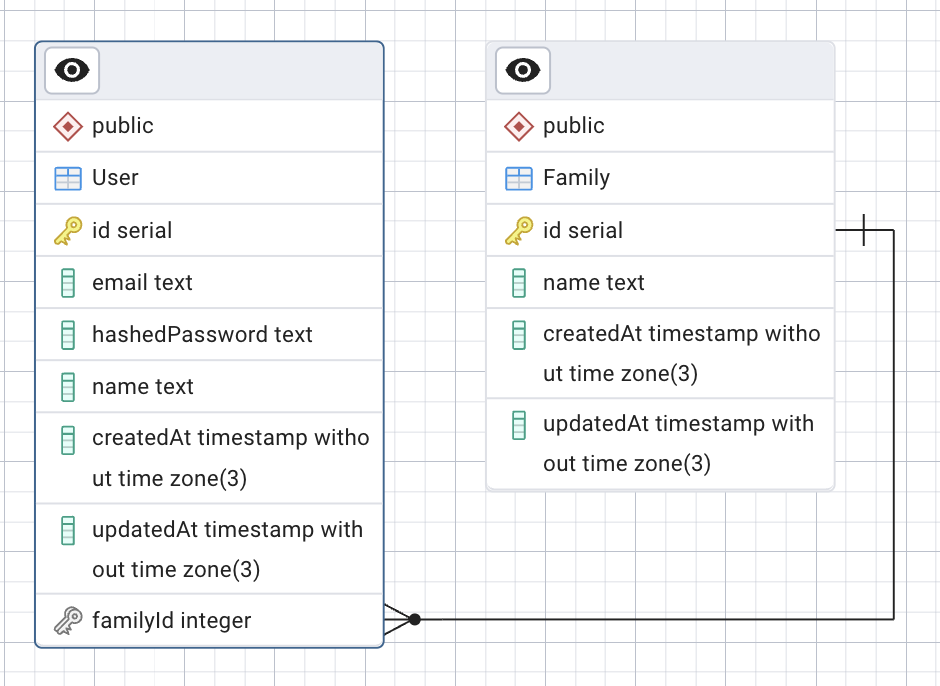
Let’s edit this file to include our User and Family models. All models live together in this one file.
prisma/schema.prisma
|
1 2 3 4 5 6 7 8 9 10 11 12 13 14 15 16 17 18 19 20 21 22 23 24 25 26 27 28 |
// This block configures the Prisma Client generator. generator client { provider = “prisma-client-js” } // This block defines your database connection. datasource db { provider = “postgresql” url = env(“DATABASE_URL”) } model User { id Int @id @default(autoincrement()) email String @unique hashedPassword String name String? families Family[] @relation(“FamilyMembers”) createdAt DateTime @default(now()) updatedAt DateTime @updatedAt } model Family { id Int @id @default(autoincrement()) name String members User[] @relation(“FamilyMembers”) createdAt DateTime @default(now()) updatedAt DateTime @updatedAt } |
In our schema, we’ve established a many-to-many relationship between users and families. This means:
- A single User can be a member of multiple Family groups.
- A single Family can contain multiple User members.
This is achieved using two key features in the schema:
- List Fields ([]): The families Family[] and members User[] syntax tells Prisma that these fields will hold a list of related records.
- The @relation Attribute: The @relation(“FamilyMembers”) attribute explicitly connects the User.families field to the Family.members field, defining them as two sides of the same relationship.
Behind the scenes, when you migrate your database, Prisma will automatically create a hidden “join table” (in this case, _FamilyMembers) to manage these connections. This powerful feature keeps your schema clean and abstracts away the underlying database complexity.
Now, with the command
|
1 |
bunx prisma:generate |
We are generating the Prisma Client based on our schema files. This is an auto-generated query builder that provides autocomplete in the editor, assists with data types, and generates a clean and readable API for interacting with your database.
For example, fetching users is as simple as:
|
1 |
const users = await prisma.user.findMany(); |
Before we create our first endpoints, we also have to create a Prisma client setup, so that we don’t initialize it every time.
src/api/lib/prisma.ts
|
1 2 3 4 5 6 7 8 9 10 11 12 13 |
import { PrismaClient } from ‘@prisma/client’; const globalForPrisma = globalThis as unknown as { prisma: PrismaClient | undefined; }; export const prisma: PrismaClient = globalForPrisma.prisma ?? new PrismaClient(); if (process.env.NODE_ENV !== ‘production’) { globalForPrisma.prisma = prisma; } |
Creating your database in docker
Every server needs a database. For this project, we will use PostgreSQL.
First of all, I recommend installing the desktop version of docker. Then we can create a new database using a simple Docker Compose file.
First, let’s create a docker–compose.yml file in your project. This is an “instruction” on how to create a Docker image that will meet standards for the project.
doker-compose.yml
|
1 2 3 4 5 6 7 8 9 10 11 12 13 14 15 16 |
version: ‘3.8’ services: postgres: image: postgres:latest container_name: next–articles–db environment: POSTGRES_USER: postgres POSTGRES_PASSWORD: postgres POSTGRES_DB: next_articles ports: – “5433:5432” volumes: – postgres_data:/var/lib/postgresql/data volumes: postgres_data: |
Now let’s update our .env file with the database connection string
|
1 2 |
DATABASE_URL=“postgresql://postgres:postgres@localhost:5433/ next_articles” |
You can start a container with
|
1 |
docker–compose up –d |
Your PostgreSQL database should now be running in Docker on port 5433.
We can finally create the initial SQL migration using Prisma with
|
1 |
bunx prisma migrate dev —name init —schema ./prisma |
The SQL migration helps us track changes in the database schema. Every time we migrate, Prisma creates a migration file with the changes that we want to apply. This is very helpful to keep track of what has historically happened with the database structure.
After your initial migration, You should greeted with message as below:
|
1 2 3 4 5 6 7 8 9 10 |
Applying migration `20250512140235_init` The following migration(s) have been created and applied from new schema changes: migrations/ └─ 20250512140235_init/ └─ migration.sql Your database is now in sync with your Prisma schema. |
Prisma has created a new path with your initial migration in the migrations/ folder. If other developers were to fetch our project, they could very simply apply all existing migrations to their fresh local database with the command
|
1 |
bunx prisma migrate deploy —schema ./prisma/schema.prisma |
Great! We have successfully created the initial setup to start working with our api. We have deployed our first migration on a dockerized database, and are ready to go.
Securing passwords
Before we create users, there’s a crucial aspect of user management we need to address: passwords. For this, we will utilize a widely used technique known as hashing. Hashing transforms a password into a fixed-length string of characters, “the hash”, using a one-way algorithm.
What does it mean? It’s impossible to reverse a hash back to the original password. When a user tries to log in, we hash the password they provide and compare it to the stored hash.
Fortunately, if we’re using the Bun runtime, we have a powerful, built-in tool for this: Bun.password. The Bun.password API provides access to modern, secure hashing algorithms like Argon2 and bcrypt.
These algorithms are intentionally slow and resource-intensive. This design makes them much more resistant to brute-force attacks where an attacker tries to guess passwords by hashing millions of possibilities per second.
Bun.password also handles salting automatically. Salting adds a random piece of data to the hashing process, ensuring that even if two users have the same password, their stored hashes will be completely different.
The best part is that since this is built into Bun, there are no external dependencies to install. We can jump straight into the code.
Let’s create our user endpoint:
src/api/users/route.ts
|
1 2 3 4 5 6 7 8 9 10 11 12 13 14 15 16 17 18 19 20 21 22 23 24 25 26 27 28 29 30 31 32 33 34 35 36 37 38 39 40 41 42 43 44 45 46 47 48 49 50 51 52 53 54 55 56 57 58 59 60 61 62 63 64 65 66 67 68 69 70 71 72 73 74 75 76 77 78 79 80 81 82 83 |
import { NextResponse } from ‘next/server’; import { Prisma } from ‘@prisma/client’; import { prisma as db } from ‘@lib/prisma’; export async function POST(request: Request) { try { const body = await request.json(); const { email, name, password } = body; if (!email || !password) { return NextResponse.json( { error: ‘Email and password are required’, }, { status: 400 } ); } if (password.length < 8) { return NextResponse.json( { error: ‘Password must be at least 8 characters long’, }, { status: 400 } ); } const hashedPassword = await Bun.password.hash(password, { algorithm: ‘argon2id’, memoryCost: 4, // memory usage in kibibytes timeCost: 3, // the number of iterations }); const user = await db.user.create({ data: { email, name, hashedPassword, }, }); const { hashedPassword: _, ...userWithoutPassword } = user; return NextResponse.json( userWithoutPassword, { status: 201 } ); } catch (error) { console.error( ‘Failed to create user:’, error ); if ( error instanceof Prisma.PrismaClientKnownRequestError ) { if (error.code === ‘P2002’) { return NextResponse.json( { error: ‘A user with this email already exists’, }, { status: 409 } ); } } return NextResponse.json( { error: ‘Failed to create user. Please try again later.’, }, { status: 500 } ); } } |
Now Let’s try our first endpoint out.
|
1 |
bun dev |
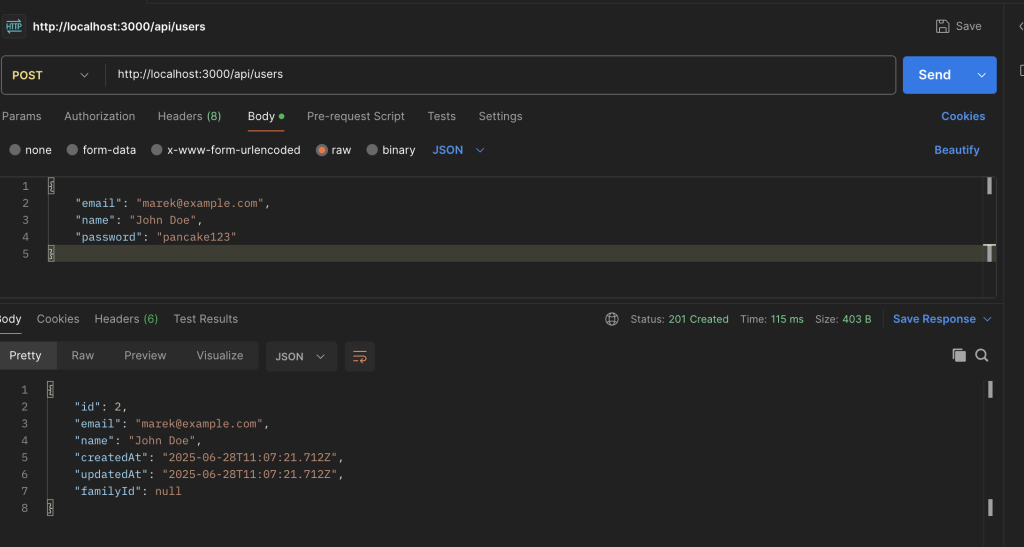
Voilà! Our first user has been created. We can see the results by running
|
1 |
bunx prisma studio |
This will open up a window in our browser with database visualisation.

Summary
In this guide, we walked through a process of building a robust backend API right inside a Next.js application.
We have used a powerful combo that has become my go-to stack: Prisma for the ORM, a Dockerized PostgreSQL database, and Bun’s built-in password hashing for top-notch security.
I’m a huge fan of this integrated approach because it’s not just for quick side-projects; it gives you incredible flexibility to build a unified middle layer, clean up data from external services, and even handle custom authentication without the complexity of a separate server.
Leave a Reply