Imagine this: You have deployed your latest feature: a universal search across all your enterprise data. It’s fast, sleek, and uses intelligent matching. Look at you, I’m so proud.
Then the feedback comes back from the client:
Searching for Apple doesn’t find apple,
My dashboard shows users in a different order than the admin panel,
I can register with the username john, but when I try to register John it says username already existsin one system, but allows it in another system
You check your code – WHERE clauses are correct, your ORDER BY statements too. You have UTF–8 encoding in all your systems. So what is going on?
Welcome to the world of Data Collation, a silent dictator that tells your databases how to interpret the characters they store. In that article, I will try to explain how to interact with diverse databases in a NestJS application.
First things first
To understand the impact of collation, we’ll build a simple NestJS app that interacts with two different SQL databases:
- MySQL: Configured with a common case-insensitive collation
- PostgreSQL: Configured with a common case-sensitive collation.
The Technology Stack for the API
- You can find the repository for the article right here,
- Docker and Docker Compose
- Node.js + NestJS CLI
Setting up the NestJS Project
I assume You know how to create a basic NestJS Project. If not, you can easily check it out in the official NestJS documentation.
The easiest way to simulate a multi-database environment with specific collations is using Docker. Create a docker–compose.yml file in the root of your project.
docker-compose.yml
|
1 2 3 4 5 6 7 8 9 10 11 12 13 14 15 16 17 18 19 20 21 22 23 24 25 26 27 28 29 30 31 32 |
version: ‘3.8’ services: # MySQL with a case–insensitive collation mysql_ci: image: mysql:8.0 container_name: mysql_ci_db restart: always environment: MYSQL_ROOT_PASSWORD: rootpassword MYSQL_DATABASE: collation_test ports: – “3306:3306” command: – —default–authentication–plugin= mysql_native_password – —collation–server=utf8mb4_unicode_ci – —character–set–server=utf8mb4 # PostgreSQL with a case–sensitive collation postgres_cs: image: postgres:14 container_name: postgres_cs_db restart: always environment: POSTGRES_USER: user POSTGRES_PASSWORD: password POSTGRES_DB: collation_test LC_COLLATE: “C” LC_CTYPE: “C” ports: – “5432:5432” |
What has happened here?
- mysql_ci: We explicitly set the server’s collation to utf8mb4_unicode_ci. The _ci suffix stands for case-insensitive.
- postgres_cs: We set the locale for collation ( lc_collate) and character classification ( lc_ctype) to “C”. The “C” or “POSIX” locale enforces a binary, byte-by-byte comparison, which is inherently case-sensitive.
Connecting NestJS to both databases:
app.module.ts
|
1 2 3 4 5 6 7 8 9 10 11 12 13 14 15 16 17 18 19 20 21 22 23 24 25 26 27 28 29 30 31 32 33 34 35 36 37 38 39 |
import { Module } from ‘@nestjs/common’; import { TypeOrmModule } from ‘@nestjs/typeorm’; import { User } from ‘./users/entities/user.entity’; import { UsersModule } from ‘./users/users.module’; @Module({ imports: [ // MySQL Connection (Case-Insensitive) TypeOrmModule.forRoot({ name: ‘mysql’, type: ‘mysql’, host: ‘localhost’, port: 3306, username: ‘root’, password: ‘rootpassword’, database: ‘collation_test’, entities: [User], synchronize: true, }), // PostgreSQL Connection (Case-Sensitive) TypeOrmModule.forRoot({ name: ‘postgres’, type: ‘postgres’, host: ‘localhost’, port: 5432, username: ‘user’, password: ‘password’, database: ‘collation_test’, entities: [User], synchronize: true, }), UsersModule, ], controllers: [], providers: [], }) export class AppModule {} |
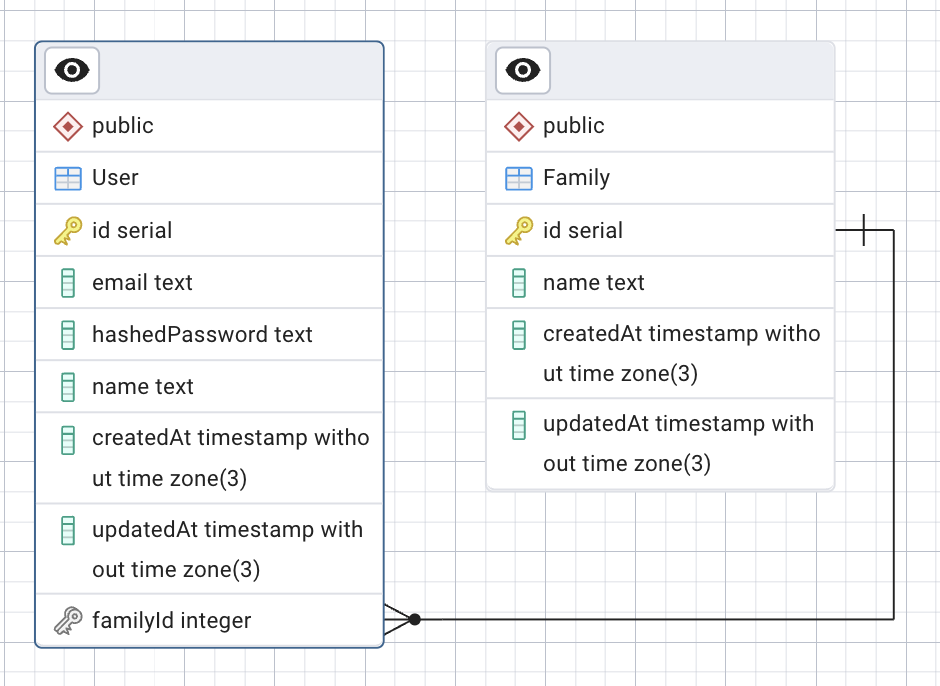
We will create a User entity with the @Unique decorator for science!
src/users/entities/user.entity.ts
|
1 2 3 4 5 6 7 8 9 10 11 12 13 14 15 16 17 18 19 |
import { Entity, PrimaryGeneratedColumn, Column, Unique, } from ‘typeorm’; @Entity() @Unique([‘username’]) export class User { @PrimaryGeneratedColumn() id: number; @Column() username: string; @Column() email: string; } |
Now, let’s implement the demo Users Service. We inject both database connections and create methods to interact with them, to showcase the differences.
src/users/users.service.ts
|
1 2 3 4 5 6 7 8 9 10 11 12 13 14 15 16 17 18 19 20 21 22 23 24 25 26 27 28 29 30 31 32 33 34 35 36 37 38 39 40 41 42 43 44 45 46 47 48 49 50 51 52 53 54 55 56 57 58 59 60 61 62 63 64 65 66 67 68 69 70 71 72 73 74 |
import { Injectable, BadRequestException, } from ‘@nestjs/common’; import { InjectRepository } from ‘@nestjs/typeorm’; import { Repository } from ‘typeorm’; import { User } from ‘./entities/user.entity’; export type DbType = ‘mysql’ | ‘postgres’; @Injectable() export class UsersService { constructor( @InjectRepository(User, ‘mysql’) private readonly mysqlUserRepository: Repository<User>, @InjectRepository(User, ‘postgres’) private readonly pgUserRepository: Repository<User>, ) {} private getRepository( db: DbType, ): Repository<User> { return db === ‘mysql’ ? this.mysqlUserRepository : this.pgUserRepository; } async createUser( db: DbType, username: string, email: string, ): Promise<User> { const userRepo = this.getRepository(db); try { const newUser = userRepo.create({ username, email, }); return await userRepo.save(newUser); } catch (error) { if ( error.code === ‘ER_DUP_ENTRY’ || error.code === ‘23505’ ) { throw new BadRequestException( `Username ‘${username}’ already exists in ${db}.`, ); } throw error; } } async findUserByUsername( db: DbType, username: string, ): Promise<User | null> { const userRepo = this.getRepository(db); return userRepo.findOne({ where: { username }, }); } async findAll(db: DbType): Promise<User[]> { const userRepo = this.getRepository(db); return userRepo.find({ order: { username: ‘ASC’, }, }); } } |
Putting theory into practice
To demonstrate the practical impact of case sensitivity, we will perform a series of API calls to create and find users in both MySQL and PostgreSQL.
Part 1: MySQL (The Case-Insensitive Database)
By default, MySQL string comparisons are case-insensitive. Let’s see what this means when creating and searching for users.
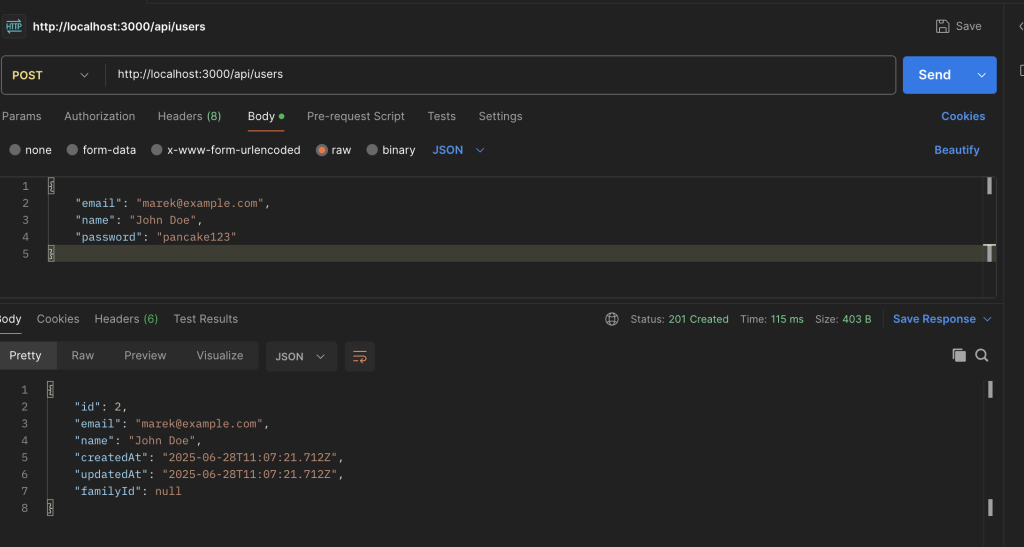
Step 1: Creating Users

Request 1: Create “john”
|
1 |
POST /users?db=mysql |
|
1 2 3 4 |
{ “username”: “john”, “email”: “john@test.com” } |
Result: Success! The user john is created as expected.
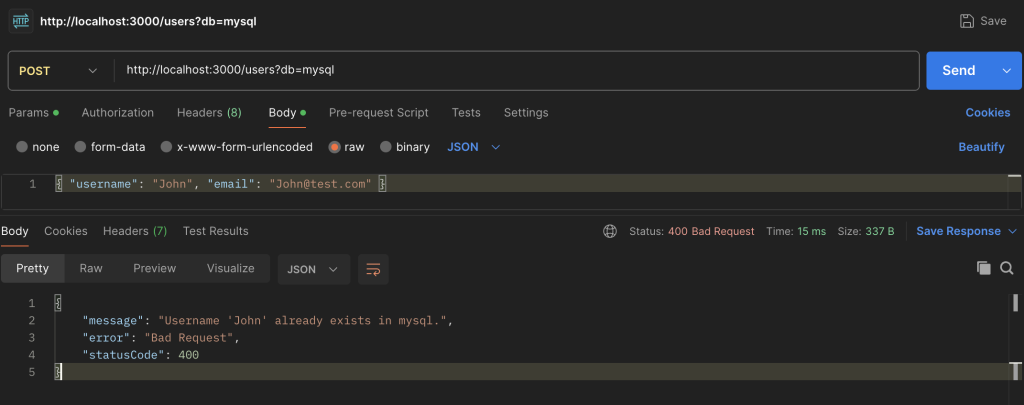
Now for the crucial test. Let’s try to create another user, John, with a capital letter.
|
1 |
POST /users?db=mysql |
|
1 2 3 4 |
{ “username”: “John”, “email”: “John@test.com” } |
Result: FAILURE! 400 Bad Request.
Conclusion: The database considers john and John to be identical, so it rejects the second request as a duplicate entry.
Step 2: Searching for Users
Now let’s see how searching works. We’ll search for the user we created (john), first using the exact case and then a different case.
Search 1: Find “john”
|
1 |
GET /users/find?db=mysql&username=john |
Result: The user john is found successfully.
Search 2: Find “John”
|
1 |
GET /users/find?db=mysql&username=John |
Result: The exact same user (john) is found again.
Conclusion: For MySQL, case doesn’t matter during a search. Both john and John point to the same record.
Part 2: PostgreSQL (The Case-Sensitive Database)
PostgreSQL, on the other hand, performs case-sensitive string comparisons by default. Let’s repeat the same experiment.
Step 1: Creating Users
Request 1: Create “john”
|
1 |
POST /users?db=postgres |
|
1 2 3 4 |
{ “username”: “john”, “email”: “john@test.com” } |
Result: Success! The user john is created.
Now, let’s try creating John again. Unlike in MySQL, we expect a different outcome.
Request 2: Create “John”
|
1 |
POST /users?db=postgres |
|
1 2 3 4 |
{ “username”: “John”, “email”: “John@test.com” } |
Result: Success! A second, distinct user is created.
Conclusion: PostgreSQL treats john and John as two completely different strings, allowing both to exist in the database.
Step 2: Searching for Users
This is where the difference becomes most apparent to the end-user.
Search 1: Find “john”
|
1 |
GET /users/find?db=postgres&username=john |
Result: Finds the user john.
Search 2: Find “John”
|
1 |
GET /users/find?db=postgres&username=John |
Result: Finds the user John. Each search returns its own specific record.
To drive the point home, let’s try searching for a user that doesn’t exist. We’ll create Apple and then search for apple.
Search 3: Find “apple” (when only “Apple” exists)
|
1 |
GET /users/find?db=postgres&username=apple |
Result: null. No user is found.
Conclusion: The search is exact. If the case doesn’t match perfectly, PostgreSQL won’t find the record.
Solving the problem
Now, how do we fix this and enforce consistent behavior?
Solution 1: Explicit Collation in Queries
You can override the default collation directly in your query. This is useful when you need specific behavior for a single query without changing the database schema.
Let’s create a new method in our service for a case-sensitive search.
src/users/users.service.ts
|
1 2 3 4 5 6 7 8 9 10 11 12 13 14 15 16 17 18 19 20 21 22 23 24 25 26 27 28 29 |
async findUserByUsernameCaseSensitive( db: DbType, username: string, ): Promise<User | null> { const userRepo = this.getRepository(db); const queryBuilder = userRepo.createQueryBuilder(‘user’); if (db === ‘mysql’) { // For MySQL, use a binary collation for case–sensitivity queryBuilder.where( ‘user.username = :username COLLATE utf8mb4_bin’, { username, }, ); } else { // For PostgreSQL, the default is already // case-sensitive, but we can be explicit // ‘C’ collation enforces binary comparison queryBuilder.where( ‘user.username = :username COLLATE “C”‘, { username }, ); } return queryBuilder.getOne(); } |
- We use TypeORM’s QueryBuilder for more control.
- COLLATE utf8mb4_bin: This tells MySQL to perform a binary (_bin) comparison for this query only, ignoring the table’s default _ci collation.
- COLLATE “C”: This tells PostgreSQL to use the binary-safe “C” collation, ensuring a strict, byte-for-byte comparison.
Solution 2: Enforcing Case-Insensitive Search
What if you want the opposite? You want PostgreSQL to behave like our case-insensitive MySQL.
|
1 2 3 4 5 6 7 8 9 10 11 12 13 14 15 16 17 18 19 20 21 22 23 24 25 26 27 |
async findUserByUsernameCaseInsensitive( db: DbType, username: string, ): Promise<User | null> { const userRepo = this.getRepository(db); // For both databases, converting to a // common case is the most portable way // But let’s show the DB-specific way first. if (db === ‘postgres’) { // In PostgreSQL, ILIKE is the standard // for case-insensitive matching return userRepo .createQueryBuilder(‘user’) .where(‘user.username ILIKE :username’, { username, }) .getOne(); } // For MySQL, the default is already case-insensitive, // so a simple findOne works return userRepo.findOne({ where: { username }, }); } |
- ILIKE: This is a PostgreSQL-specific operator that performs a case-insensitive LIKE operation.
- Alternative (more portable): Using LOWER() on both the column and the input value (LOWER(user.username) = LOWER(:username)) works across most SQL databases.
Summary
As we’ve seen, data collation is a powerful and critical database feature that directly impacts how your application behaves.
By understanding how to identify these issues and using tools like TypeORM’s QueryBuilder or application-level normalization, you can regain control and ensure your application provides a consistent, predictable experience for your users, no matter what database is running behind the scenes.
Don’t let the silent dictator rule your data. Acknowledge it, understand it, and make it work for you.